
前言
這篇文章是爲了自己要學習幾個Nextflow的重要功能而寫的
並寫一個程式實踐這些功能
Nextflow的基本概念會跳過不講
可以參考我之前寫的文章快速了解或是看官方文件
Nextflow教學 - 以最小可行專案為例
看這篇你能夠瞭解到以下的功能
- 平行與合併處理檔案
- 運算資源分配
- 輸出結果至指定目錄
其中以平行與合併處理檔案最爲重要
一個pipeline在不同分析階段會使用平行或合併處理
平行分析通常是爲了能夠最大化運用運算資源
合併分析則是能夠將樣本間的結果整合分析
要平行還是合併處理還是取決於需求與用途
爲了學習使用Nextflow的平行與合併分析,因此開發Reich這個metagenomics pipeline
以下章節會使用Reich的程式碼來說明
平行與合併處理
簡單說明Reich的分析流程,它的流程是參考CZID
由於是示範,因此只列出較重要的步驟
- 以多個fastq檔作爲輸入
- 以Bowtie2比對人類序列並去除
- 以Minimap2比對非人類序列
- 整合分析結果輸出報告
以下爲示意圖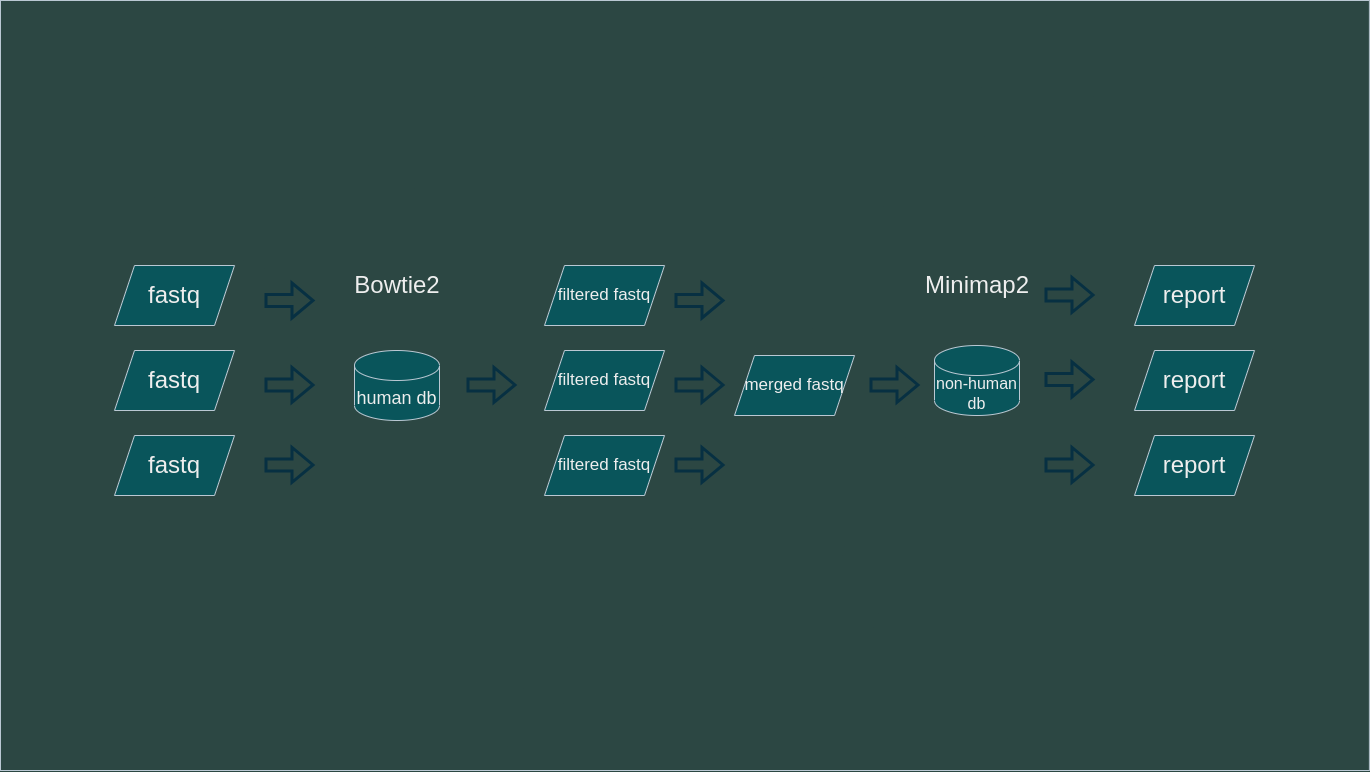
1, 2, 4步驟是平行處理
3步驟是合併處理
workflow {

    reads = channel.fromPath(params.reads, checkIfExists: true)
        .map {it}
        // .view { "reads: $it" }

    validated_reads = validate_reads(reads)
    nonhuman_ch = host_filter(validated_reads.valid_reads)
    subsampled_ch = subsample_reads(nonhuman_ch.nonhuman_reads)

    hit_ch = pathogen_alignment(subsampled_ch.subsampled_reads.collect()).flatten()
    taxon_ch = assign_taxon(hit_ch)
    abundance_ch = abundance_calculation(taxon_ch.hit_json, taxon_ch.taxon_json)
    summary_report(abundance_ch.hit_json, abundance_ch.taxon_json, abundance_ch.rpm_json)
        .view { "summary report: $it" }

}
從上面的程式碼可以得知params.reads是輸入的fastq檔案 ("*.fastq.gz")
使用channel.fromPath().map()將輸入的fastq檔案轉換成channel,並定義成reads
可以想象成雖然是1個channel但實際是是有N個channel處理平行處理N個fastq
接下來的validate_reads (process)是驗證輸入的檔案格式是否爲fastq並輸出valid fastq的channel (validated_reads)
到pathogen_alignment (minimap2)時可以看到是使用了subsampled_ch.subsampled_reads.collect()
collect()是將N個channel合併成1個channel進行合併處理
處裡完後再用flatten()將每個sample的結果轉換成N個channel,之後的步驟都是平行處理
運算資源分配: process的max forks
平行處理的process可以使用maxForks來限制最大的平行數量
預設是使用全部CPU threads數量,看起來很棒,但實際還是得要考慮每個process的運算資源需求
backend/workflows/configs/local.config
workDir = params.work_dir

process {
    withLabel: "normal" { maxForks = params.threads }
    withLabel: "performance" {maxForks = 4}

}
假設bowtie2實際最佳的threads數量是4, cpu的thread數量是12,那同時間執行3個process是最佳結果
若太多或太少都會影響效能
太少的情況: maxForks設定爲2,那同時間最多只會使用8個cpu threads,剩下的4個cpu threads就閒置了
太多的情況: maxForks設定爲4,那同時間最多會使用16個cpu threads,但cpu threads只有12個,因此會造成cpu thread的競爭,反而會降低效能
PublishDir: 輸出至指定目錄
如果沒有在process中特別設定,nextflow是不會將process的output輸出的
只會輸出到work目錄
若要將重要的結果輸出,可以使用publishDir
以下爲範例程式碼
backend/workflows/modules/pathogen_alignment.nf
process pathogen_alignment {
    publishDir "${params.out_dir}", mode: 'copy', pattern: 'hit/*.hit.json'

    label "performance"
    input:
        path(reads)
    output:
        path('hit/*.hit.json'), emit: hit_json
    script:
    """
    python $workflow.projectDir/scripts/pathogen_alignment.py --out_dir hit --queries $reads --reference $params.nonhuman_db --threads $params.threads
    """
}
publishDir "${params.out_dir}"將結果輸出到指定目錄mode: 'copy'是將結果複製到指定目錄,預設是建立symbolic linkpattern: 'hit/*.hit.json'是指定要輸出的檔案,可以使用正規表達式
所以檔案實際輸出位置是${params.out_dir}/hit/*.hit.json
結語
Nextflow雖然是個很棒的pipeline framework,但是因爲很完整、功能很多,因此學習起來會有點困難
光是看官方文件看了老半天也找不到符合自己需求的範例
建議可以直接看別人的程式碼,找一個還看得懂的專案,然後自己實踐一遍
舉幾個我有參考的Nextflow pipeline
搜尋到這些pipeline的方法是在Github搜尋nextflow,然後篩選Language:python & sort:Recently updated
https://github.com/topics/nextflow?l=python&o=desc&s=updated
